Saturday, March 1, 2008

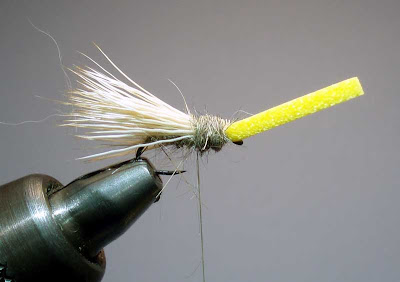
"The Balloon Caddis"

"The Ballon Caddis"


Materials Used:

Size 14 Partridge CS 20 Mike Weaver Arrow Point Barbless Dry Fly Straight Eye
Olive 8/0 Thread
Davy's Bug Dub
Yellow Foam

Step by Step:

This pattern was designed by Roman Moser. Very productive pattern for fast water and riffles. If you ever had a chance to watch Caddis as they float downstream they shiver or skip across the surface film. Try to imitate this motion by jiggling the tip of the fly rod while holding the rod at sholders height off the water. High sticking the fly rod keeping as much line off the water as possible and gently shaking the tip of the rod will cause this fly to skip on the waters surface.


Step 1: Cut a piece of yellow foam. Closed-cell foam - Polycelon foam will work. You can find it at most fly shops or craft store.


Step 2: Place Size 14 Partridge CS 20 Mike Weaver Arrow Point Barbless Dry Fly Straight Eye in vise. You can use any dry fly hook to match the caddis size although I have found the straight eye works best to provide the skipping presentation.


Step 3: Tie in the piece of foam extending it out over the eye and run the thread back to the bend.


Step 4: Twist Davy's Bug Dub onto thread and wrap dubbing to form the body, about half way up the shank.


Step 5: Using a patch of Elk Hair cut a bunch of hair place in stacker to even the tips as shown. For this pattern you only need a sparse amount of Elk Hair.


Step 6: Stack the hair and attach the elk wing so that it extends past the bend. So let's discuss body-to-wing length ratios of the Caddis Fly. An artificial's silhouette is important to the success of any fly. On Caddis patterns I prefer not to extend the wing too far beyond the bend of the hook. Generally a good rule of thumb is that no part of a caddis should extend beyond the bend of the hook more than twice the hookgap distance.


Step 7: After cutting excess elk hair wrap tread to even the thorax, add dubbing to thread and build the thorax. Notice the final thread position is at the back end of thorax.


Step 8: Fold foam back over thorax, tie off and whip finish.


Step 9: Clip excess foam. The back tag of the foam can be clipped right at the thread to shorten the foam tag.


Finished Balloon Caddis

Labels: ,

0 Comments:

Post a Comment

Subscribe to Post Comments [Atom]

<< Home